
 Help always available here :-
Finance : Receipts & overheads
Help always available here :-
Finance : Receipts & overheads
Receipts and overhead payments are two of the trading transactions that any business needs to record. They reflect the money coming into the business and some of the ways that money goes out.
Within the system, the recording of receipts and overhead payments is very similar and so the description here is relevant to both, although for brevity the descriptions below will refer only to receipts.
Before recording your receipts or overhead payments, make sure that you have entered at least one receipt type and overhead type via the corresponding Settings option. See the Setting up tutorial section for details.
Note: You should enter a record for bills that you receive and invoices that you raise as soon as you reasonably can. Do NOT wait until you pay the bill or receive the invoice payment. The reason for this will become clear as you work through this and the next tutorial topic and also the "Trading and VAT Summary" report will be able to give you a more complete picture.
To enter a receipt or overhead payment, select the appropriate option from the main Finance menu. For receipts the page will look like this:
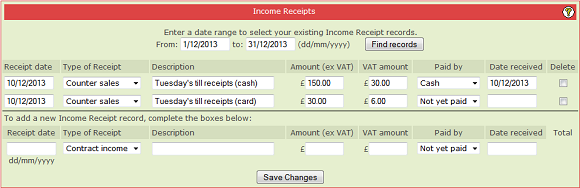
The lower section is where you enter a new record. Simply fill in the boxes and click Save Changes.
The upper section of this page will show you records that you have previously entered. Above you can see two entries made for 10th December.
Over time you will, of course, make hundreds of entries so at the very top of this page you can specify a date filter that will limit the number of records displayed. When you first enter this page the filter will default to the last seven days but you can alter the dates to any range you wish to view, then click Find records to display them.
Any of the records you have entered can be edited or even deleted. You can change any of the information by simply clicking in the relevant box and altering the information in it. Remember to click Save Changes when you have finished!
To delete a record entirely, click in the relevant "Delete" tick box and then click Save Changes.
In the above screen shown, you can see a box for VAT Amount. This is shown because the My Details option has been set for being VAT registered. See the tutorial topic on Setting Up / VAT Setup for more details. If you have set the My Details option for NOT VAT Registered then the VAT Amount box will not appear - you will have only a single Amount box.
Notice that the first entry above is shown as Paid By Cash and the date received is shown. The second entry is shown as Not Yet Paid and the date is blank. The description indicates this is because they are card payments and typically you do not receive the money from card payments until some days after the transaction.
One of the reports (covered in the next tutorial topic) allows you to track these "not yet received" receipts (and overheads).
Once you have verified that the money for that transaction has definitely been received you can then edit that record, change "Not yet paid" to "non-cash" and enter the date.
Apart from helping you to monitor your delayed receipts via the report, this is also important if you are VAT registered and operating Cash Accounting. See the tutorial topic Setting Up / VAT Setup for details.
|
|
|

